
Is your windows 10 computer not work well for gaming? Then you must my ultimate guide to optimizing windows 10 for gaming and performance in 2021.
You know Gaming by using your PC is a common trend among youngsters in the modern world.
Quite obvious that in today’s world, to play games on your PC, Windows 10 will be your preferred OS.
Windows 10 is a great OS when you consider gaming, mixing games that are native, supporting retro titles, and for streaming Xbox 1.
However, gamers have claimed to have a slow gaming experience when using Windows 10 as their OS.
True it is not the perfect platform for gaming.
But it can be made the perfect one by tweaking some optimization on the system. It will surely make your games run fast on PC.
Before you take up any optimization plan ahead, it is important that you know the factors that can affect your Windows 10 gaming experience.
Commonly, factors like the computer CPU, graphics card, hard drive, memory, network, etc. are some of the factors having a negative impact on the gaming experience.
How to Optimize Windows 10 For Gaming & Performance?
We are here to discuss the top 10 useful optimization tricks to make gaming a wonderful experience in Windows 10.
To enhance the performance of gaming on your Windows 10 PC, first, analyze the factors that are affecting the same.
A thorough study of all the reasons that might affect gaming, we have deduced the below tips as the perfect hack of improving the experience of gaming on Windows 10.
Method 1: Optimization of Gaming Mode in the Windows 10 device:
Do you want the best performance from Windows 10 for gaming purposes? You can try to achieve the same by optimization of the gaming mode.
To begin the optimization, you can follow the below steps.
- Combine press the keys “Windows + I” to open “Windows Settings”.
- Now you have to Click on “Gaming” then it’ll open new popup windows.
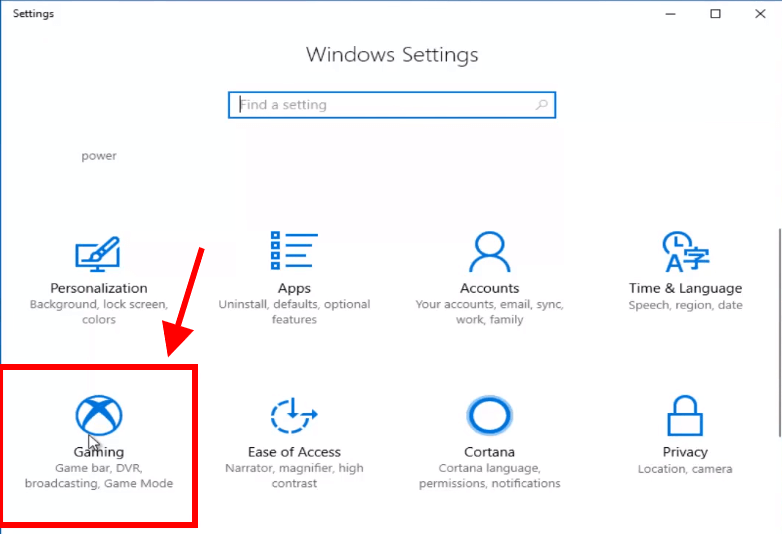
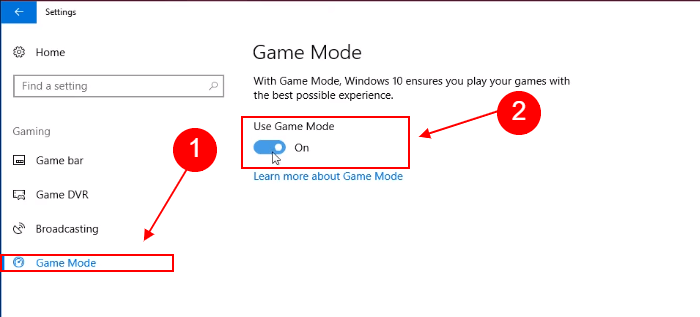
- You will get a lot of options then click on “Game Mode” Settings and Turn on “Use Game Mode”.
For a Windows 10 Pc that allows Game Mode enabled, the Optimum rate of the frame is achieved by auto-managing of the resources.
Moreover, when the gaming mode is enabled, the Windows updates get auto-suspended.
Surely this will help improve your gaming experience on a Windows 10 device.
Method 2: Disabling the Nagle’s Algorithm:
If you want to improve your IP/TCP network efficiency by a reduction in the packet numbers, that are linked with the network, you need Nagle’s Algorithm.
This is an algorithm that hampers the internet speed in order to bundle the data packets on the system.
Of course, having this enabled in the system is useful. But when it comes to gaming, it contributes to system issues with latency. The indication is quite clear here.
If you want a smooth experience with online gaming, you need to disable the Nagle’s Algorithm.
To enhance the system performance while gaming, let’s first begin with finding out your IP address.
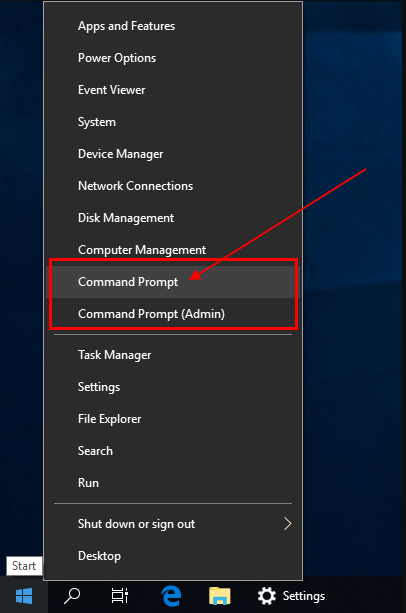
- Press the keys “Windows + X” on the keyboards.
- You will come across a windows activity list. Select the “Command Prompt” option.
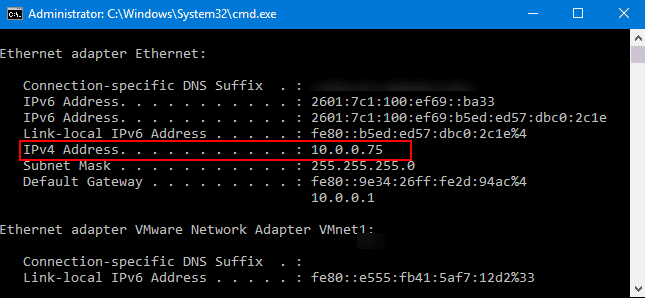
- At the newly opened command prompt window type the words “ipconfig” and press the “Enter” button.
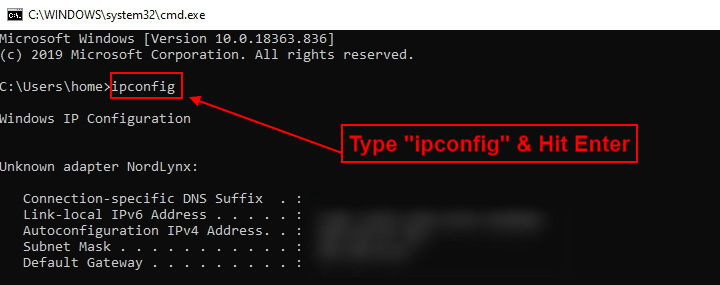
- From the configuration list, identify the IP address of your PC from “IPv4 address”.
Once you have the IP address in hand, its time to make modifications in the Windows “Registry”. This will now help with the disabling. The steps for the same are.
- Open the “Run” window by pressing the Keys “Windows + R”.
- In the dialogue box type the word “Regedit”.

- Click on the button stating “OK” to continue and open the “Registry Editor” window.
- Locate the address bar on the editor. Copy the path
HKEY_LOCAL_MACHINE\SYSTEM\CurrentControlSet\Services\Tcpip\Parameters\Interfaces
This helps in navigation through folders.
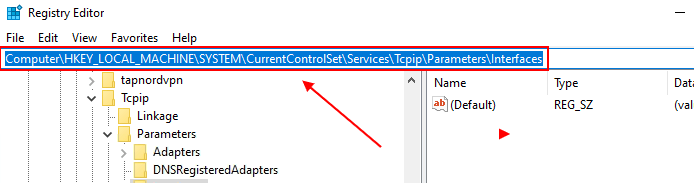
On the left-hand side of the page, there will be folders, with file names comprising numeric and alphabets.
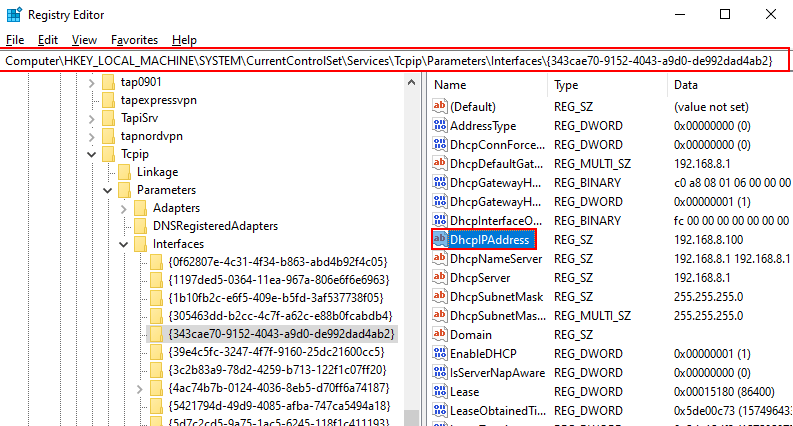
- Its time to match the IP address you noted earlier with the folders to have access to that one folder, that “DhcpIPAddress” listed in it.
- Upon finding the correct match, press the “Right-click” button on the right of the folder panels to create 2 new keys.
- Upon “Right-click”, select “New” followed by “DWORD (32-bit) value”.
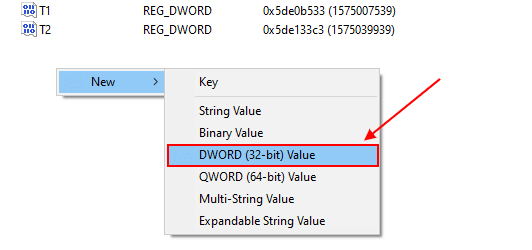
- Name each of the keys as “TcpAckFrequency” and “TCPNoDelay” respectively.

- “Double-click” on each of these keys to fixing their value data 1.
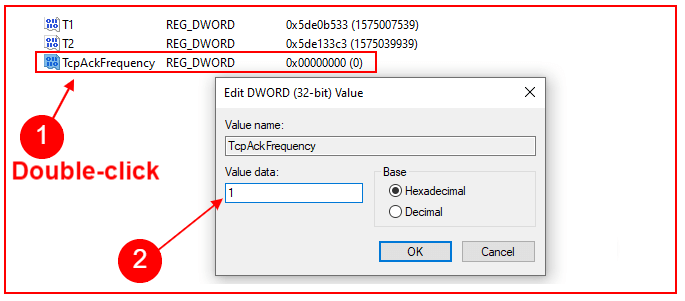
- Press the “OK” button to finish the procedure.
This is meant to disable Nagle’s Algorithm and enhance internet speed. In case you still face a problem during gaming, repeat the process to set the parameter at ‘0’. There is also a way to check if this worked by testing your internet speed at speedcheck.org.
Method 3: Windows 10 optimization with higher speed DNS for online gaming purpose:
Often youngsters play online games with the multiplayer interfaces and rely on the remote network server.
For Windows 10, online traffic is likely to hamper your game responses.
Of course, in a situation like that, upgrading your internet connectivity to a faster one is helpful.
To make their server up-gradation and cheap, here are the steps of optimization hacks.
- Press the keys “Windows + I” and open “Windows Settings”.
- Find the “Network and Internet” link and click on the same.
- From the “Network Settings” page scroll to “Change Adapter Setting” or “Change Adapter Options” and click on the same.
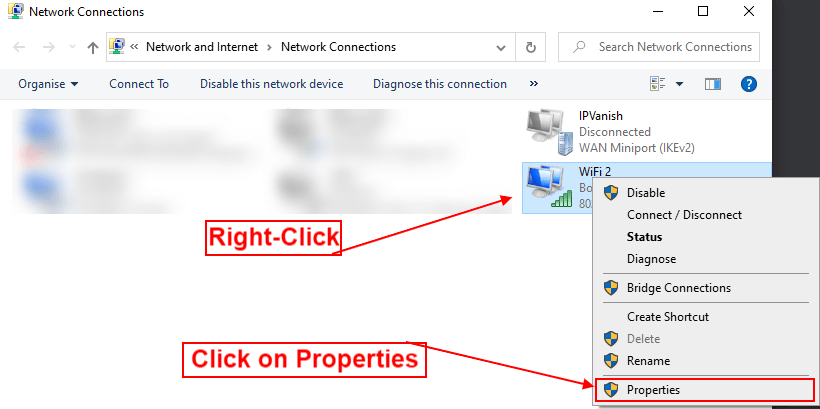
- The “Network Connections” page opens now. Find the “Wireless Network” icon and “Right-Click” on the same.
- Go to the “properties” key from the drop-down list and click.
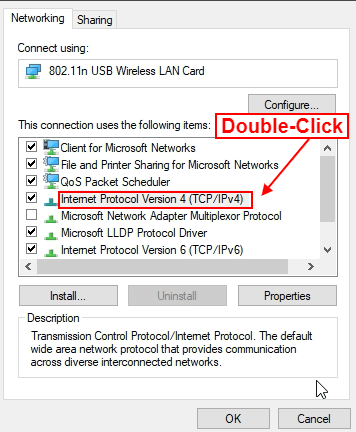
- Click on “Internet Protocol Version 4 (TCP/IPv4)” from the properties list to highlight it.
- Note the two entries of DNS. This will be needed in the future.
- Replace each with 1.1.1.1 and 1.0.0.1 respectively.
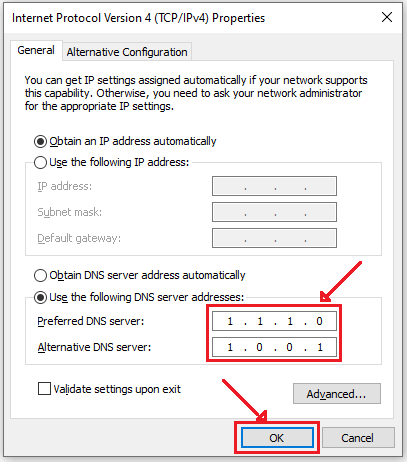
- Click on the “OK” button and close the window.
- Restart the browser you use as default now.
You will definitely have a faster internet connection now, the ultimate need for gaming online.
Method 4: Disabling Automated Windows 10 Updates for improving gaming performances:
Windows 10, when present as an OS, goes for auto-updating from time to time without seeking permission from the user. This poses a threat to your gaming experience.
Your system might undergo “Restart” or “Shut Down” due to the automatic updates.
You might have a game that is not saved on time.
Think about how troublesome it will be for your gaming if the system shuts down without any prior alert!
The problem doesn’t end here.
If you have a Windows 10 update going on in the background while gaming online, you are likely to experience slow internet.
Well you can’t exactly disable the auto-update feature of Windows 10, but you can surely delay the updates.
Delaying will ensure that there is no interruption while you enjoy a game The hacks to get that done are.
1. Press keys “Windows +I” to open your “Windows Settings”.
2. From settings click on “Update and Security” and get access to “Windows Update”.
3. Find and select “Advanced Options”.
4. From the options list select “Update Options”.
5. From the new list select and disable “Restart this device as soon as possible when a restart is required to install an update.”
6. After that, enable the “Show a notification” feature. This gives alert systematically and periodically if the Windows wants to restart after an update.
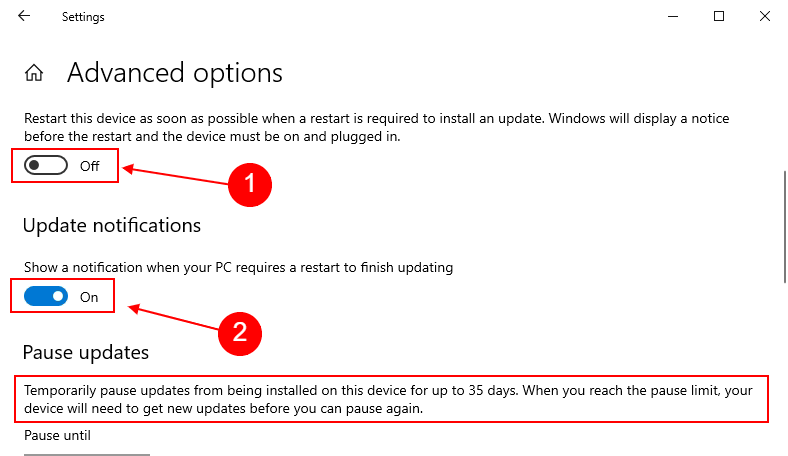
7. Finally click on the link for “Pause Update”. This delays the Windows update installation for a time frame of 35 days.

Try to be more specific if possible. This helps in the prevention of downloading Windows Updates and its installation while you are active on the system.
Method 5: Disabling Windows 10 Notifications:
Windows 10 is an OS that is featured with focus assistance to control your notifications.
Notification alerts are usually accompanied by chimes and pop-up alerts. But these pop-ups can hamper gaming.
One can use the Focus Assist to minimize the effect of notification son your gaming.
To disable or manage the notification alerts, you can follow the below steps.
- Open your “Windows Settings” by pressing the buttons “Windows + I”.
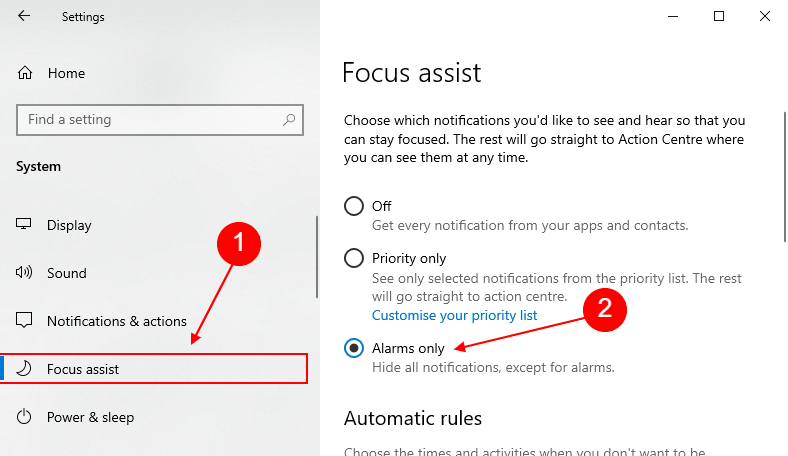
- From the system select, the key “System” followed by “Focus Assist”.
- From the new window click on “Alarms only”. This hides all notification alerts apart from alarms.
- Once the new notification setting is finalized close the page and get over with the work.
Method 6: Prevent games that are steam auto-updated:
Games when played by using Windows 10, you are actually using Steam for installing and buying them.
However, the Steam update features are annoying. When you have steam, you can’t pervert the games from auto-updating.
As a result of this, games that you don’t use my use your system memory and limit your access to the networks. In short, your gaming might get slowed down.
Prevent the steam features from auto-updating games by the below steps.
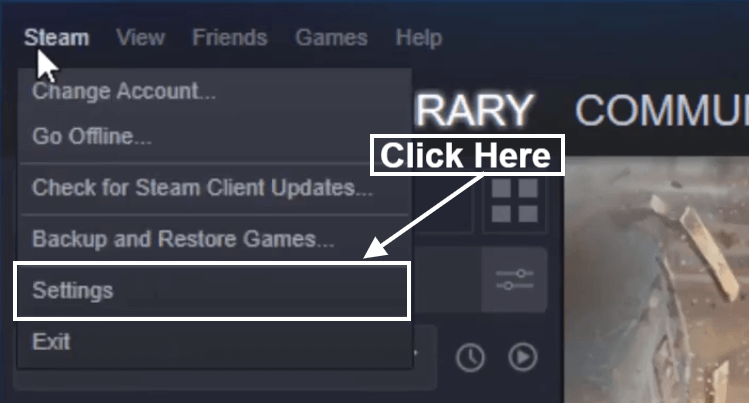
- Launch “Steam” first on the PC.
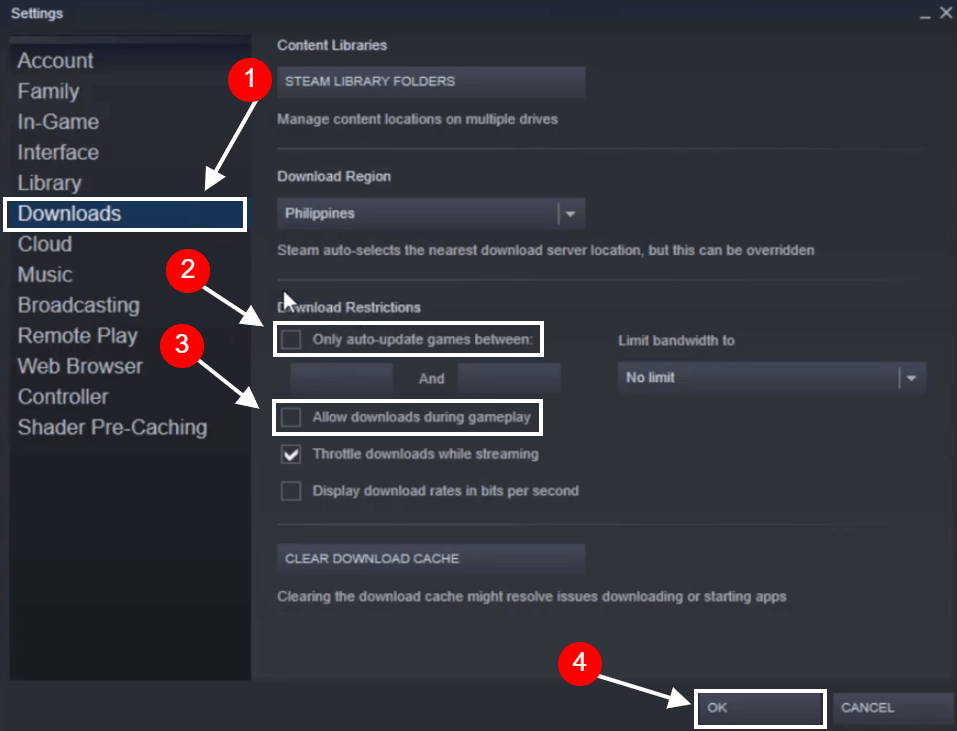
- Open Steam and go to “Settings” followed by the “Downloads” tab.
- Click to uncheck the key saying, “Allow downloads during gameplay”.
Another way to block steam from downloading unused gaming updates are.
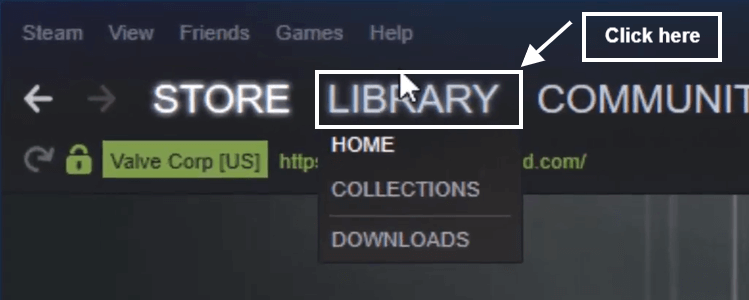
- From the launched steam window open the “Library” icon.
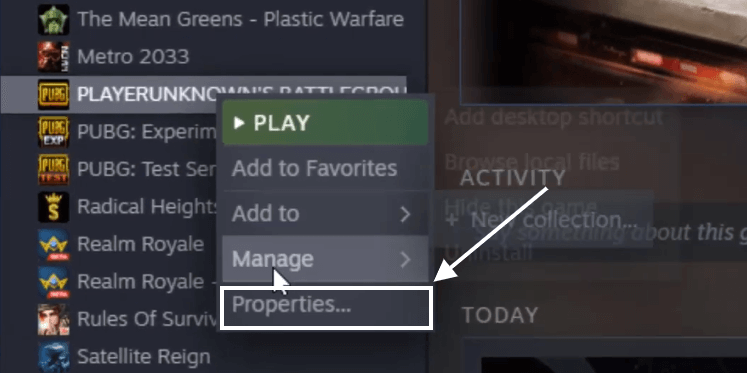
- Select the game that you are not using and “Right-Click” on that.
- From the drop-down list click on “Properties”.
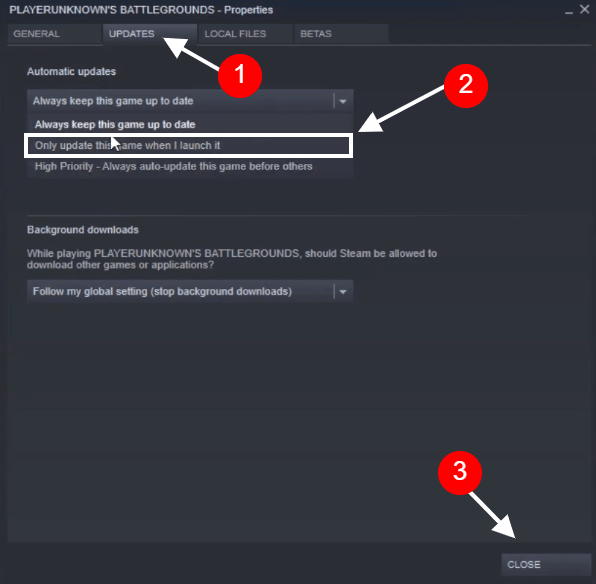
- From Game properties select the key “Updates”.
- Modify setting from “Always keep the game up to date” to “Only update this game when I launch it”.
This will optimize your Steam and enhance the gaming performance of Windows 10.
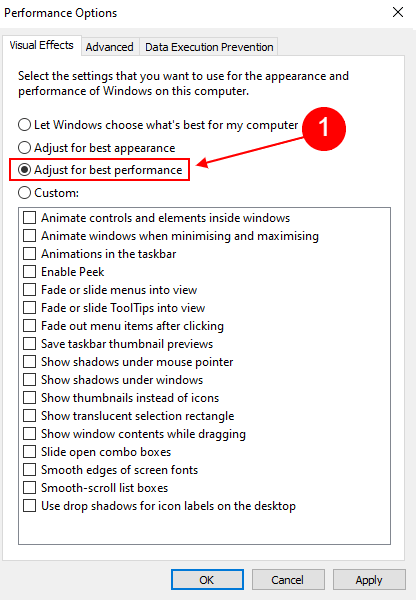
Method 7: Alter the Visual effects of Windows 10 PC to enhance game performance:
Did you know that your gaming or system power might get affected by the system (Graphical User Interface) or GUI? The appearance of Windows 10 is by default impressive.
If you have a glossy GUI at your background, it might conflict with the fore-running game.
You can optimize Windows 10 by modifying the visual settings here as below.
- Press keys “Windows + I” to open “Windows Settings”.
- Type-out the word “Performance” at the search bar of the page and press “Enter”.
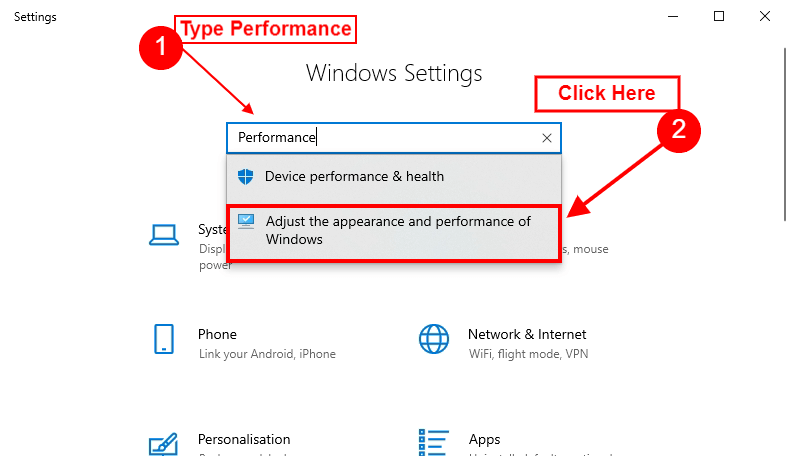
- From Performance settings window select “Adjust the appearance and performance of windows”. And click on the “Apply” link.
- From settings click on the tab called “Advanced”.
- Set the “Adjust the best performance of” feature on “Programs”.
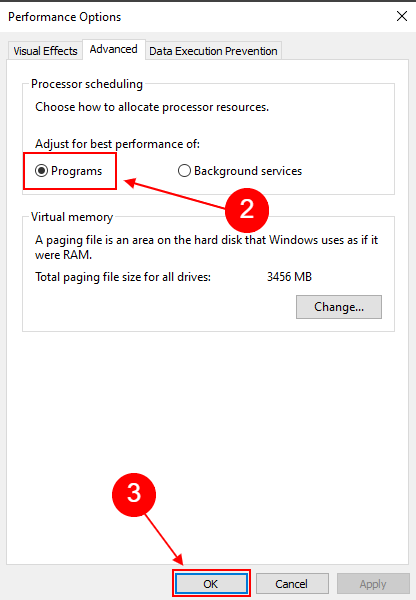
- Select the “Apply” and press “OK” for confirmation.
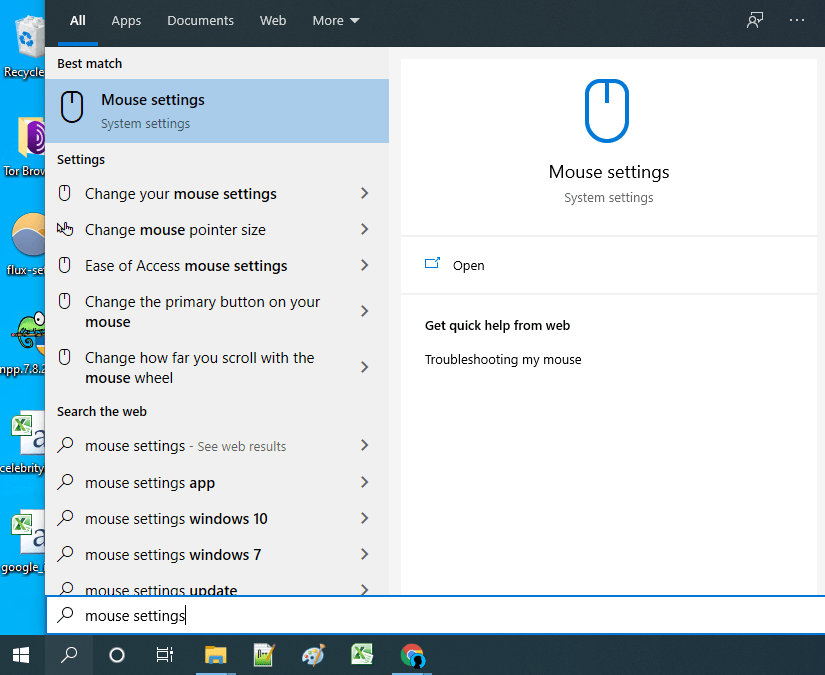
Method 8: Adjustment of Mouse settings for windows 10 optimization for gaming:
Did you know your Mouse might impact your gaming performance on Windows 10? The mouse feature called “enhance pointer precision” can affect the mouse while gaming.
To avoid that, its best to optimize the settings of your mouse and disable the feature.
- Go to the Search button Type “Mouse Settings” and Now Click on It.
- Then click on “Additional Mouse Options” Under the Related Settings.

- Open and view the options from the “Pointer Options” tab.
- Clear the checkmark against “Enhance Pointer Precision”.
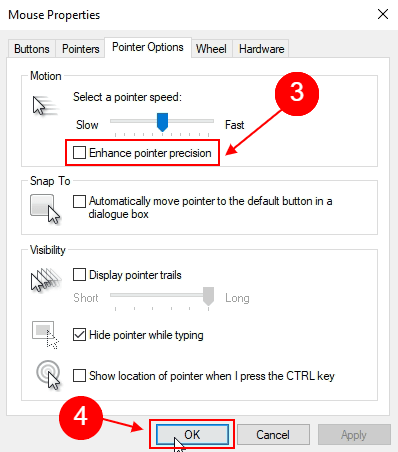
- Click on “Apply” Finally press the “OK” key for exiting.
One might use these steps to modify the feature precision speed.
Method 9: Enhance gaming activity in windows 10 by maximizing power:
You might neglect this, but power has an effect on the performance of your games. With adjustment of the power from system settings, gamers have experienced, better performance.
- From the “Start” key click on the “Search” button on windows 10.
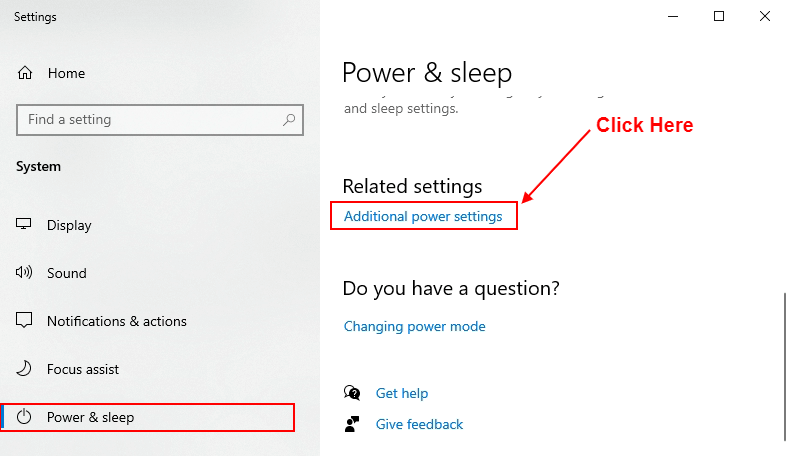
- In the search bar type in “Power & Sleep settings” and “enter”.
- From drop-down-menu select “Additional Power Settings”.
- From the next list select the option for “High performance”.
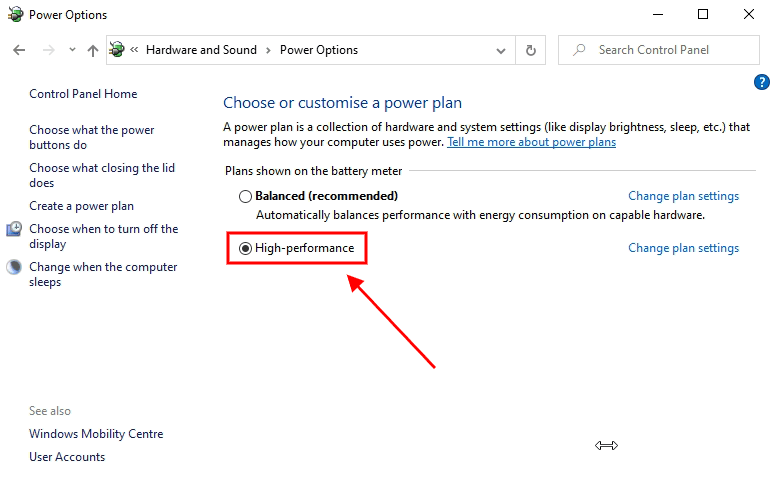
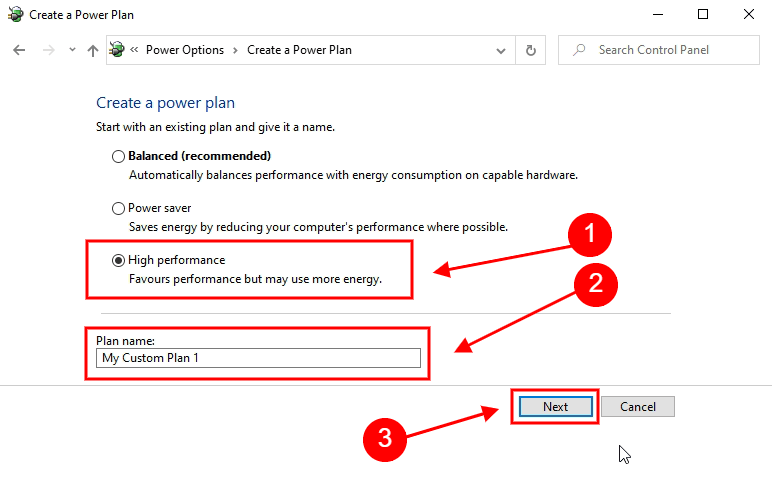
- If you don’t have a pre-configured plan for Power, click on the tab for “Create Power Plan” and customize a new plan for the power.
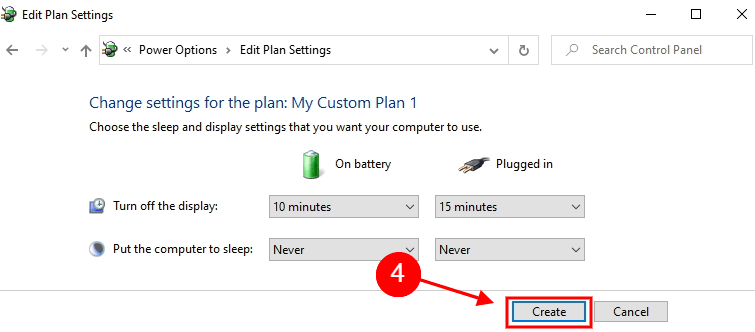
When you optimize the power, your system performs better by consuming higher temperature and energy levels.
So, if you have a plan to do this, we suggest you be cautious.
Method 10: Optimize Windows 10 by updating the GPU drivers:
The core of your gaming experience on Windows 10 PC is Graphic Processor Unit. If you want your games to work fast, you need to have the latest driver updated.
In fact, not updating the GPU can even lead to the crashing of the system as a result of Bug.
Update your GPU with the following steps and enhance the performance.
- Open the “Run” dialogue box by pressing the keys “Windows + R”.
- Type the command “devmgmt.msc” and then press on “OK” to process.
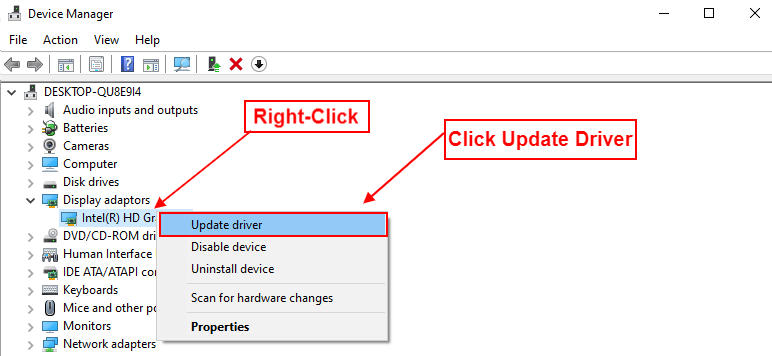
- This opens the “Device Manager” Window.
- Expand the “Display Adapter” link to locate the driver and select the same.
- “Right-click” on the driver for drop-down-menu.
- Select the “Update driver” link.
- Select the “Search Automatically for Updated Driver Software”.
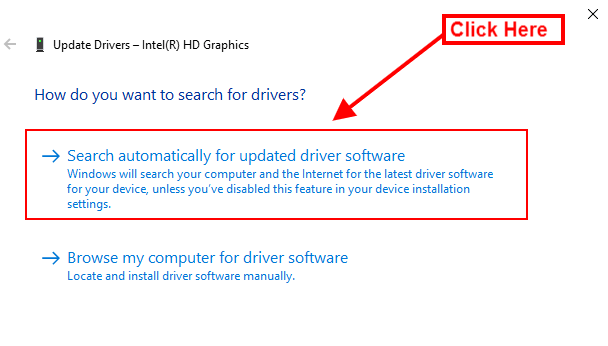
- Click on the “Follow” button to continue.
This is updating the GPU driver. Open your game once after updating and check if the performance has indeed improved.
Conclusions:
We have discussed 10 hacks that can help you to optimize Windows 10 for gaming purposes. All of them are effective and must-try for a person totally into gaming.
Read Also:
- 5 Ways to Turn Off Sticky Keys in Windows 10 Permanently
- Top 4 Tricky Methods to Delete old Backup files in Windows 10
- Fix Your Windows License Will Expire Soon Error Windows 10
- FIX No Audio Output Device Is Installed Windows 10
- Fix Windows 10 Update Error Code 0x8024a105
- Fix Wacom Tablet Driver not found on Windows 10