
Every iPhone user has a story they looking for tips on how to transfer photos from iPhone to Windows 10 PC.
it’s funny, right?
Let me tell you how do you transfer photos from iPhone to the computer in very simple ways.
In this entire post, We will be discussing 4 such simple methods to transfer photos from iPhone to Pc or Laptop.
How to Transfer Photos from iPhone to Computer?
The methods can be simple, but before you begin, Install iTunes to your PC.
If your windows 10 PC, it will only recognize an iPad or iPhone device, when iTunes is installed in its File Explorer.
Let’s first see the steps you can follow to install the iTunes on your PC.
- Go to the “Start” menu in your taskbar and launch the “Microsoft Store”.

- In the “Search” bar type in “iTunes” and search for it.

- Once found click on the “Get” link to start the app downloading.

- Post completion of downloading, click on “Launch”.

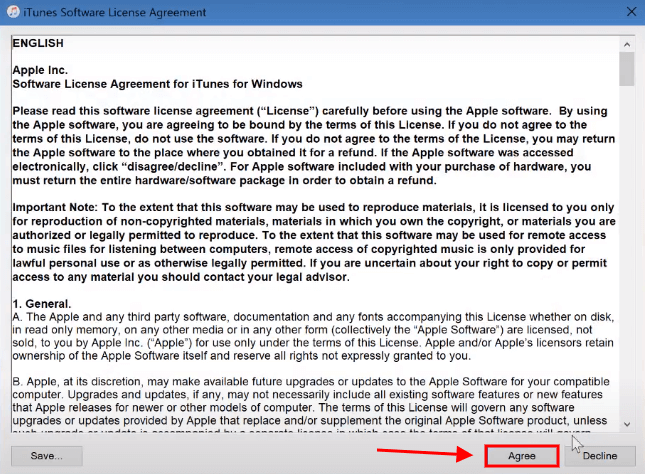
- Click on “Agree” to complete installation by accepting iTunes Software License Agreement.
Now that you have iTunes in your system, you can follow any of the below procedure for photo transferring from your iPhone to your Windows 10 PC.
Method 1: Conventional Photo Import from iPhone to Windows 10 PC:
This is the conventional method for phot transfer by using a USD cable, connecting your PC with your phone.
Remember to keep your phone on and unlocked while the transfer is initiated.
In general, computers don’t recognize devices that are locked.
Also, ensure that the pictures you are willing to transfer to your PC from iPhone are not stored under Cloud. Their presence in the device is essential for any transfer.
Once all these points are clear, you can follow the below steps.
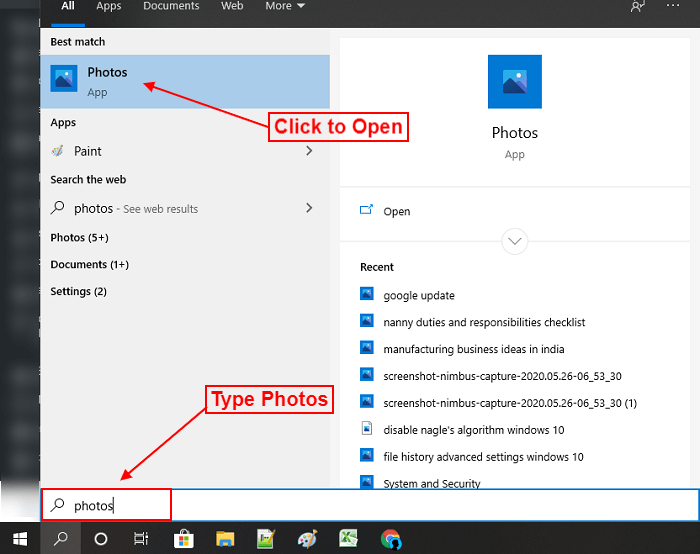
- Open the “Photos” app on PC by clicking on the “Start” button, and Type “Photos”.
- Select the link “Import” from the Right-hand upper corner of the window.

- From the drop-down-menu click on “From a USB device”.
- Allow your PC to detect the device connected through USB before importing.
- While the detection is on, check your iPhone for the prompt saying, “Trust this computer”.
- Click on “Allow” or “Trust” as prompted by the device for continuing.

- Select the photos available on the device that you wish to transfer.
- Click on “Import to PC” on your phone to initiate the transfer.

Your photo transfer is now successful in just 8 steps.
Method 2: Photo Transferring with the use of File Explorer:
If you want a speedy photo transferring process, then File explorer is the ideal option for iPhone users.
You just need the iTunes installed on your Windows 10 PC and then you can follow the below steps.
- Connect your iPhone with PC by a USB cable.
- Go to the “Start” menu from the taskbar and launch “Windows Explorer”. Or else, press the keys “Windows + E” to open the explorer in shortcut.
- In the explorer window click the arrow sign “>” next to the word “This PC” in the address bar.
- Check the sub-menu under “This PC” and select “Name’s iPhone” or the iPhone name your PC recognizes.
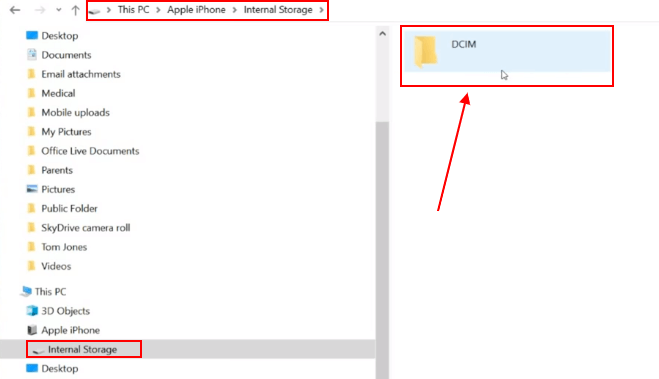
- When you get access to the iPhone menu, Right-Click on “Internal Storage”.
- From the storage menu right click on the “DCIM” folder to access all photos.
- Press the keys “Ctrl + A” to select all the images in the folder.
- Press the keys “Ctrl + C” to copy all selected images.
- Choose any folder on PC as the “Destination” where you want the images.
- Right-click on the “Location” folder to open.
- Press the keys “Ctrl +V” to paste all copied images in the destination folder.
In the entire process, ensure the iPhone – PC connection is uninterrupted.
Method 3: Use of iCloud for image Transfer from iPhone to Windows 10 PC:
Did you know, your windows 10 PC is capable of wireless synchronization with your iPhone if you have iCloud installed on the PC?
Yes, it’s possible.
But for image transfer, you need to first keep a backup of images in iCloud.
Once there is the backup, you can follow these steps:-
- Go to the “Start” menu from the taskbar and launch “Microsoft Store”.
- In the search bar type “iCloud” to find the same.

- Once found, click on “Get” to begin downloading.
- Once the download is complete click on the item to “Launch”.
- After a successful launch of iCloud, insert your “Apple ID” and “Password” to Sign In.
- Once you are in iCloud on your PC, click on the “Photos” button.
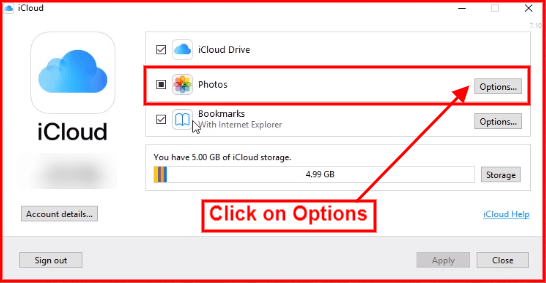
- From the drop-down-menu click to check the box beside “iCloud Photos”.
- In iCloud Photos locate “Upload new photos and videos from my PC” and uncheck the box beside. This ensures the mono-direction transfer of images from the iPhone to your Windows 10 PC.
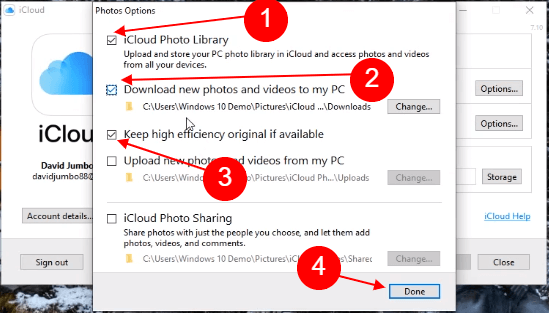
- When the settings are checked or unchecked, click on “Done” and “Apply”. Now the photo downloading to your PC begins.
Method 4: Use of Syncios Manager for Photos Transfer:
If you want a useful yet free application on your PC for file transfer from iPhone to your Pc, then look out for Syncios Manager.
When you use this, you get complete access to images on your PC for editing, previewing, etc.
The simple steps that allow you to use this app can be stated as.
Download Syncios Mobile Data Transfer for Windows 10 and it’s also available for, Mac & Android.
- Go to the “Start” menu and launch the “Syncios Manager” app after installing it on your device.
- Connect your iPhone with Windows 10 PC by using a USB cable.
- Open your iPhone and go to the “My device” interface.
- Click on “Photos” from the “My Device” menu.
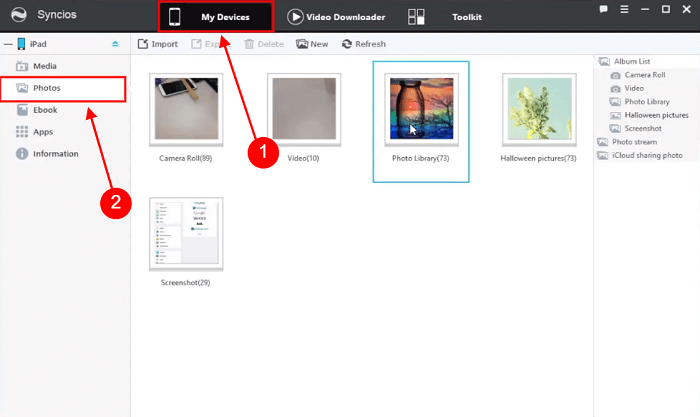
- Select the photos you want to transfer on your PC.
- Click on the “Export” link to initiate the transfer.

- Close the application on PC once the transfer is successful.
( Or You can Watch this Video Tutorial )
Conclusions:
All the above methods are useful for iPhone users who wish to transfer, edit, or take back up of their images and another file to a windows 10 PC.
To make your device compatible don’t forget to install the iTunes.
These processes are extremely beneficial for people who use the iPhone on a daily basis and would love to manage their image gallery.
Learn Also:
- How to Find WiFi Password On Windows 10
- How to Optimize Windows 10 For Gaming
- How to Delete old Backup files in Windows 10
- How to Turn Off Sticky Keys in Windows 10
- How to Fix Wacom Tablet Driver Not found on Windows 10
- How to FIX No Audio Output Device Is Installed Windows 10
- How to Fix Windows 10 Update Error Code 0x8024a105